
Here’s the deal: Aperture Priority and Program mode are convenient. They let you take your mind off things and concentrate more on the shot. However, knowing which shutter speeds produce what kinds of images can give you far greater creative control. In this guide, we will take a look at some shutter speed examples to show how they can affect the look of your photographs.
By understanding not just how different shutter speeds “look”, but also how the shutter itself works and operates, you will do your own photography a great service. Believe me, the importance of a thorough understanding of these topics can’t be overstated!
So, without further ado, let’s take a look at some shutter speed examples for general photography.
- The Importance of Shutter Speed
- How Does A Shutter Work?
- The Effects of Shutter Speed
- Generic Shutter Speed Examples
Why Does Shutter Speed Matter?
To get one question out of the way, why do we need to bother with shutter speed examples at all?
Well, the short answer goes like this: while you might have been assuming that shutter speed, ISO, and aperture are interchangeable, reality begs to differ.
Sure, if you flip over into aperture or shutter priority mode, handling just two sides of the exposure triangle (or just one, using Auto ISO) doesn’t really restrict you in most shooting scenarios.
Still, the aperture plays a distinct and different role in your photography compared to ISO, which in turn is distinct from shutter speed.
By acting on different aspects of your composition, they produce different results.
https://www.youtube.com/watch?v=1wHtRelnbRk
In automatic modes, your camera will treat all three parameters as equals, and juggle around the numbers with only one goal: create a well-exposed shot.
However, if you really want to get serious about your photography, there is far more to learn about shutter speed than that.
Sounds interesting?
Read on below for a much deeper dive into the science of your camera’s shutter. We’ll go through the ins and outs of the shutter as a mechanical device and its unique role.
In the end, you will also get a lot of handy shutter speed examples to help you in your future work.
How Does A Shutter Work?
First off, you need to understand just what the shutter in your camera is, what it does, and how.
The shutter represents one of the most crucial parts of the camera system. This is because it is the sole piece that ultimately decides when the sensor is exposed to light, and for what amount of time.
Without the shutter, we could never expose proper photographs. Without any light, the sensor can never form an image at all. On the flip side, with too much or constant light, what we get is an overexposed blank frame.
So, somewhere in the middle between no exposure and a constant exposure lies our sweet spot. The shutter speed control is what helps us get near that sweet spot.
But how does this happen, exactly?
To cut a long story short, there are three different types of shutters. It’s crucial for you to know which of these you’re working with. That way, you can consider its advantages and disadvantages and incorporate them into your photography.
1. Focal Plane Shutters
The most common kind of shutter on interchangeable-lens cameras with sensors of full-frame size and smaller has always been the focal plane shutter.
This type of shutter gets its name from the fact that it sits right in front of the sensor, on the so-called focal plane.
Most commonly, it consists of a pair of interleaved blades called shutter curtains. During the film era, fabric shutters were common. Their lightness and economy made them an obvious choice.
However, as the sun can burn holes into fabric shutters, metal shutters rose in popularity. This only accelerated with advances in miniaturization. Today, most shutters are constructed using lightweight titanium blades.
No matter the material, a focal-plane shutter always works the same way. Drawing the blades across the sensor, usually from top to bottom, it temporarily blocks light. The shutter purposely leaves a small gap between the two curtains where light can pass through.
The curtains are articulated in such a way that this gap can be adjusted in size. At the same time, the speed with which they travel is also variable.
When you play with the shutter speed control on your camera, what you are actually changing is the size of that gap, as well as the curtain speed.
Advantages and Disadvantages
The focal-plane shutter is mainly so ubiquitous because it’s reliable and can reach very high speeds. It is also easy to design at any scale and for any kind of camera system.
However, focal plane shutters have a few disadvantages, too.
The most significant is that they can’t sync with electronic flash at higher speeds.
Because of the moving blades, focal plane shutters also produce a certain noise and vibration that can contribute to camera shake.
Finally, focal plane shutters are also known for a specific type of distortion. This usually occurs when trying to capture a fast-moving subject.
Because the shutter blades traveling across the sensor expose it piece by piece, high-velocity subjects can appear stretched or poorly proportioned. This is the so-called rolling shutter effect.
2. Leaf Shutters
For the longest time, leaf shutters were the only alternative to focal plane shutters for consumer-grade photography. Particularly in formats larger than 35mm, leaf shutters continue to be the number one choice.
They operate based on a simple principle. A series of petal-like metal blades called leaves, open and close to control the light entering the lens. Usually, the leaves sit within the lens itself, in between the glass elements. Leaves at the back end of the lens are also common.
The leaves work such that when closed, they overlap completely blocking all light. When opened, they disappear into their housing.
Leaf shutters are common in fixed-lens cameras and interchangeable-lens medium format cameras. Why have they persevered over the focal plane shutter here, and not elsewhere?
Let’s consider the reasons below.
Advantages and Disadvantages
On the one hand, leaf shutters offer plenty of enticing features not found elsewhere.
Leaf shutters always open and close fully with all blades in unison. Because of this, there is none of the distortion inherent in focal plane shutters. They can also synchronize with flashes at any speed.
Because the leaves are arranged in a roughly circular fashion, they are actually balanced from a kinetic standpoint and produce barely any vibration. They also tend to be quieter than focal plane shutters.
However, using this design also comes at a certain cost. For one, leaf shutters rarely ever reach the speeds that focal plane shutters like to spoil us with.
Most leaf shutters top out at 1/500th of a second. By comparison, modern focal plane designs regularly reach up to 1/4000th or even 1/8000th in some cases.
In addition, when designing an interchangeable-lens leaf shutter camera, one must take note that each and every lens needs to have its own shutter mechanism built in. For compact camera systems, this is simply too uneconomical to be feasible.
This is why 35mm and smaller-size leaf shutter cameras usually contain a fixed lens.
3. Electronic Shutters
Finally, we should also address the new kid on the block. Electronic shutters are rapidly gaining in popularity these days, spurred on by the spread of mirrorless cameras. Camera phones also use electronic shutters as their sensors are a way to accommodate any other type.
An electronic shutter does exactly the same thing as what a focal plane or leaf shutter does. It moderates the amount of light entering the lens.
However, unlike other designs, the electronic shutter achieves this without any moving parts whatsoever. How?
In simple terms, by turning the whole sensor on or off selectively instead of using curtains. Most electronic shutters work in a sequential manner.
That is, the sensor is segmented into a grid of lines. The camera scans each line, and the visual information contained in it, one by one.
Global shutters, which use further electronic trickery in order to read the whole sensor area at once, do exist. However, as of today, they remain prohibitively expensive for most.
Advantages and Disadvantages
Because electronic shutters don’t need moving parts to function, they save a ton of space. As an added bonus, they are also completely free of noise and vibration. And they last longer since there’s no physical wear and tear.
By controlling the exposure entirely at the sensor level, an electronic shutter can reach extremely high speeds, including stepless or “in-between” speeds often unavailable on traditional alternatives.
This all sounds great. But don’t run to your retailer of choice yet! Electronic shutters are definitely no panacea.
First, they often exhibit a rolling shutter effect. Compared to focal plane shutters that also have this problem, it is usually more severe, particularly when recording in video mode.
This is due to the limited rate at which the individual lines of sensor data can be read out.
True, global shutters fix this issue. However, as previously mentioned, they render the already-expensive electronic shutter truly unobtainable for all but specialist professionals.
What Effect Does Shutter Speed Have On Your Photograph?
Now that we fully understand how a shutter works and what the differences between different types of shutter are, we can move on to its function.
What exactly makes the shutter so important?
To answer this, consider some of the information you just learned. The shutter always does two things simultaneously.
First, it exposes the sensor to light. Second, it decides how long that exposure lasts.
The latter is what can really make or break your photography.
Let’s take a look at some shutter speed examples to find out exactly how.
Example No. 1 – Shooting Fast-Moving Objects From A Stationary Position
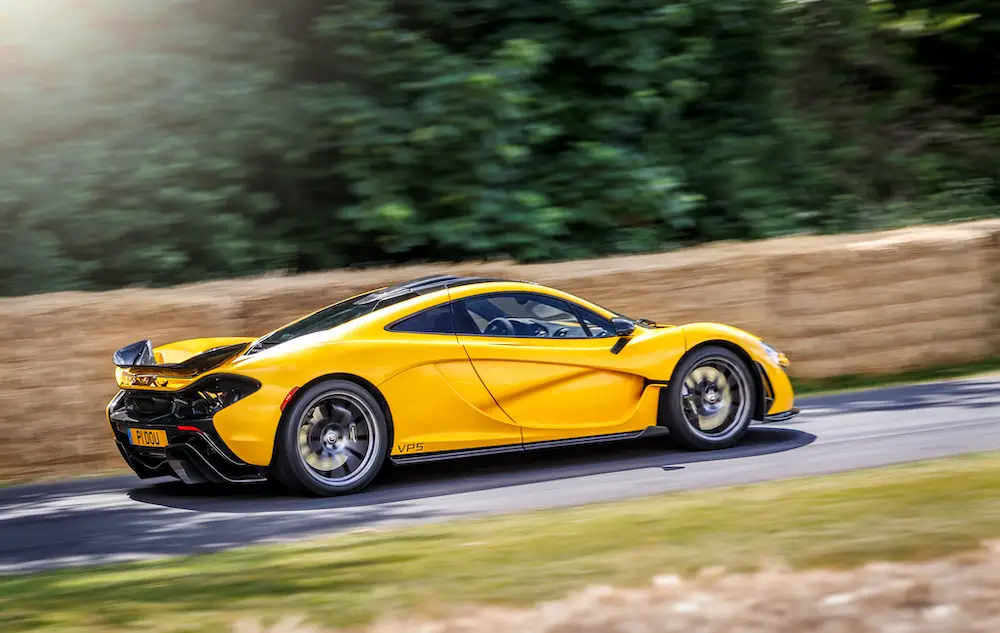
In the photo above, notice how most of the car is perfectly in focus whilst the foliage in the foreground and background appears blurred? In fact, if you pay attention you will see there is an element of motion to the grass, leaves, and rims, whereas the car body itself appears to be stationary.
This has all to do with shutter speed. The above shot was taken with a shutter speed of 1/200.
Note also how, since this shot was taken in the morning, with the sun still somewhat low and off to the side, the fast shutter speed naturally went along with a larger aperture.
This contributed to a smaller depth of field, further bringing out the car as the defining feature of the composition.
Example No. 2 – Shutter Speed For Stationary Indoors Scene

In this shot, we’re looking at an indoor scene with light coming in mostly through the windows on the right. This lighting is indirect, and not very strong, though it was clearly shot on a bright day. In the background, some parts of the room remain dipped in shadow.
The shutter speed used here is 1/160.
While indoor scenes tend to be less well-lit than outdoors at the same time of day and weather conditions, the light falling in from the windows still made this scene bright enough.
Using a slower speed here would have risked overexposing some of the most crucial segments of the composition.
Example No. 3 – Shutter Speed For Tracking Fast-Moving Objects
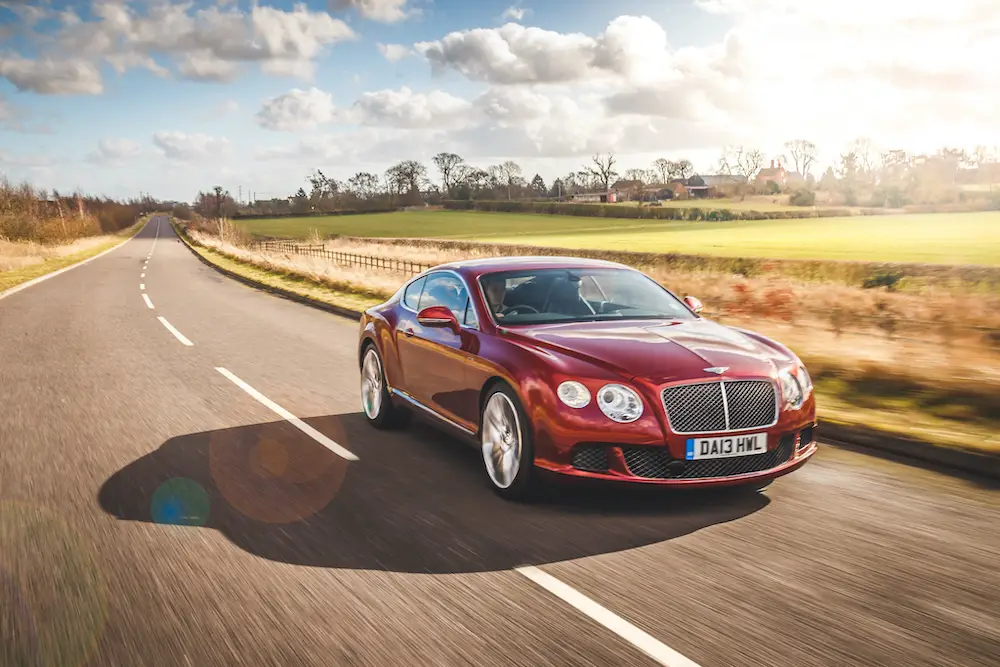
Here, we have a similar environment as the first of the shutter speed examples of the moving car above.
Yet, the shutter speed used to create this shot is completely different, a decidedly slower 1/60. How come?
First of all, note how for this shot, the photographer employed a tracking vehicle. The camera was mounted on the following truck that drove ahead of the subject and tried to closely match the car’s speed on the road.
By comparison, for the first car shot above the camera simply stood on a tripod by the side of the road, tracking the car as it drove by.
The latter technique necessitates a much faster exposure because relative to the photographer, the car appears to be moving much more.
We didn’t want to make the car appear as though it was actually standing still completely, so extreme speeds such as 1/500 and beyond were not useful. On the other hand, slower speeds, even at a low ISO, would risk overexposing the image as we’re shooting against the sun.
Therefore, 1/60 provided a fine middle ground.
Example No. 4 – Shutter Speed For Outdoors Cityscape, Midday
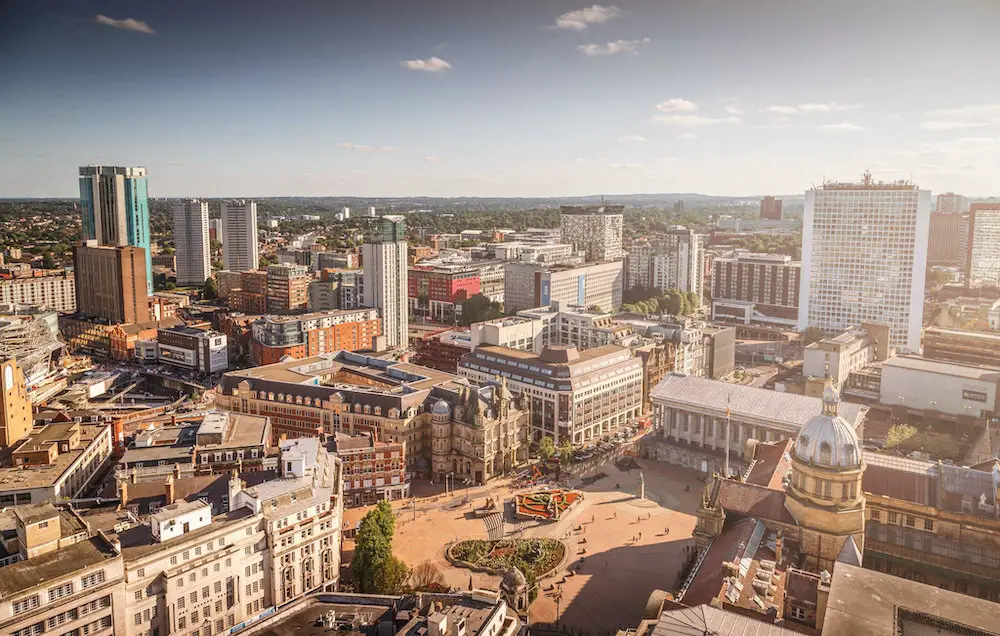
Here, we have a wide-angle shot of a vast cityscape taken shortly before noon. There is plenty of light to go around and lots of detail in the scene.
The shot was taken at a speedy, but not excessive 1/100. True, since there is not much motion in this frame, and since the lighting is so intense, you could have achieved similar results with a faster speed setting. However, this would have necessitated an appropriately wider aperture.
In this cityscape shot though, we wanted to express the scale and expanse of the architecture that you see in the photo, and a shallow depth of field would have worked against that.
Therefore, keeping the shutter speed as slow as possible while narrowing down the aperture resulted in a composition that was just right.
Example No. 5 – Shutter Speed For Outdoors Cityscape, Nighttime
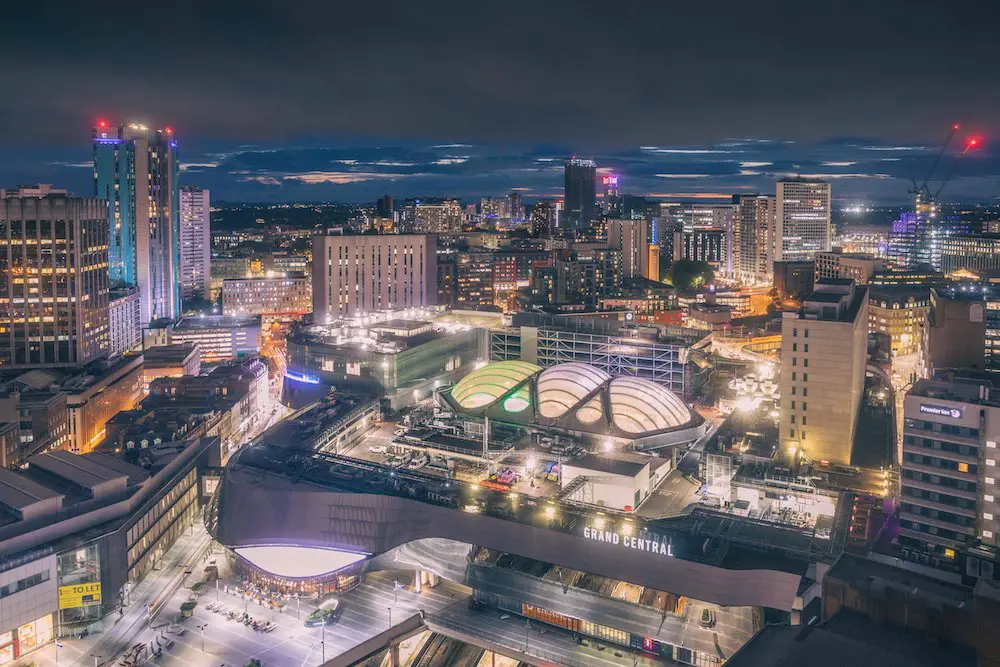
When photographing at night, the levels of available light are staggeringly different compared to what it’s like at any point during daytime.
Our human eyes don’t really perceive this difference consciously – a street lamp or vehicle headlights in the middle of the night can seem just as bright to us as the sun at noon.
In reality, these different luminosity levels are orders of magnitude apart.
This helps explain why we had to use a shutter speed of a whopping 13 seconds in the above shot. Such long exposures are not unheard of in nighttime photography.
Far from it, they’re close to the norm!
Note the countless little light fixtures visible in this scene. From windows to lamp posts, hundreds of bright spots twinkle across the frame. In fact, there is more light than a visible shadow!
And yet, mostly due to the lack of sun, this shot would have been hopelessly underexposed at anything faster than a few seconds of shutter speed.
That should tell you the immense power that the sun holds over how we compute our exposure triangles and set our shutter speeds.
Example No. 6 – Evening Landscape With Moving Subjects
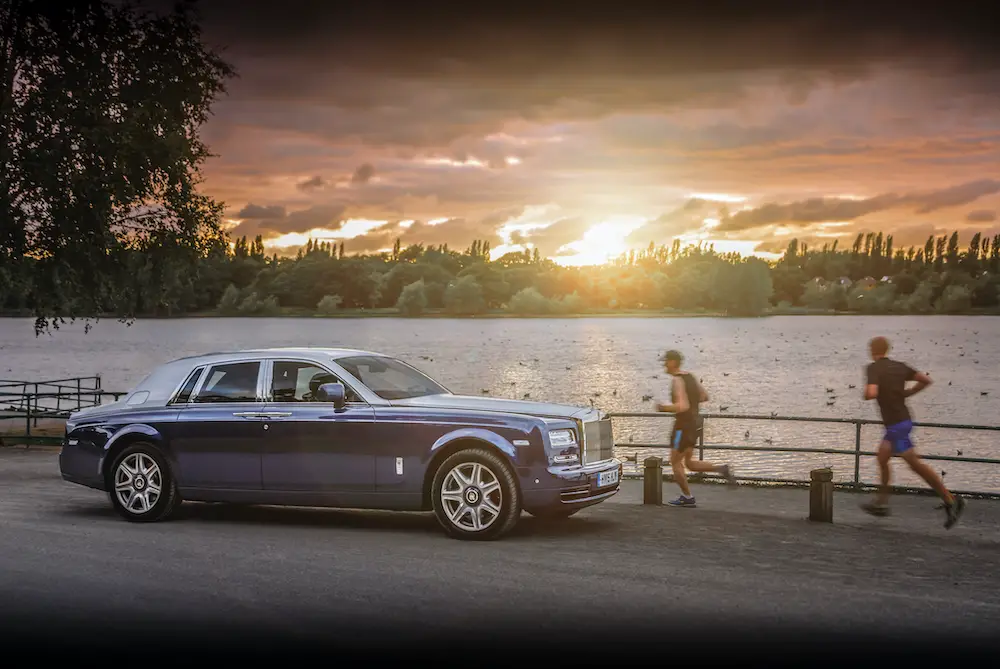
In this composition, selecting the shutter speed was an easy feat. Despite shooting with the sun facing the camera, the lighting is low. The evening sky has already lost a lot of its luster and strength, and in addition, there is some cloud coverage.
On top of that, we have a whole bunch of moving subjects, including the two runners in the foreground and the numerous seabirds in the water behind them.
We wanted to bring out this movement in contrast to the stillness of the environment, so the shutter speed was set to 1/50.
This allowed the shot to be well-exposed while also adding a slight sense of motion blur.
Generic Shutter Speed Examples for Practice
I hope that the above shutter speed examples helped to shed some light on just how the shutter can affect the look of your photographs, and how you can use it to your advantage.
Still, there is a big chance that none of the above shots correspond perfectly to the kind of photography you’re planning.
Photography is a very personal thing with countless variations in form and genre, and it would be impossible to cover everything in this guide alone.
That’s why below, you will find a short rundown of shutter speeds. Each will feature a description explaining its most common usage scenarios.
This way, you can try to develop a sense of which shutter speeds suit which kinds of images.
1/4000th to 1/8000th – Extreme Action Photography
Shutter speeds in this range are not just rare because relatively few cameras in the history of photography have been capable of them. They’re also hardly ever necessary.
In most cases, speeds above 1/2000 or so only make sense when photographing extremely fast-paced action, such as car racing, with a super-telephoto lens that benefits from a fast shutter to reduce the effects of camera shake.
Other possible applications include extreme sports events, gunshots, and aerobatics, as well as fast-moving subjects in exceptionally lit environments such as a desert at noon with a clear sky.
Note that at a shutter speed this fast, almost any degree of movement is going to appear frozen, with basically no motion blur at all.
1/800 to 1/2000 – Freezing Motion
This is the default range for action photography, as well as most shots that involve following a fast subject in bright light. Unless you specialize in an area that requires super-high speeds as discussed above, it is unlikely you will ever truly need to go far above 1/1000th of a second in your photography.
This range is also great for portraits shot with a wide aperture on a bright day.
1/250 to 1/600 – Moving Subjects, Moderate Lighting
This range in shutter speeds is the highest that many portraits and street photographers tend to use. It is very capable of “freezing” moving subjects in place while allowing much more light to enter the lens compared to higher speeds.
During the middle of the day in the shade without direct sunlight, or on an overcast afternoon, this is an optimal shutter speed range for moving subjects.
1/50 to 1/125 – General Purpose Daylight Photography
This is arguably the most versatile shutter speed range for most photographers. In daylight, it allows you to both frame moving and stationary subjects with ease without a lot of blur.
It is also a perfect range for the early morning or late evenings. If you want to try your hand at sunset photography, for example, expect to be dialing in these numbers a lot.
1/5 to 1/25 – Creative Use of Motion Blur
Back when cameras had separate dials for fast and slow shutter speeds, the slow speeds generally began at around 1/25. This is because 1/25 is the speed where motion blur starts to become readily noticeable at every focal length.
Many street photographers use this range to creatively add a blur effect to their compositions. Picture, for example, moving crowds that blend together, or streaks of light caused by passing cars.
But also if you photograph mainly stationary subjects, these shutter speeds prove useful. Except when in direct sunlight, this speed range is very effective in landscapes, architecture, and other applications.
Remember though that all slower speeds like these require a tripod to avoid excessive camera shake and blur.
1/2 seconds to 30 seconds – Nighttime Photography
When photographing at night, longer speeds, often in excess of a second, become your best friend.
These shutter speed examples are also used to create short time lapses, as well as exaggerated, often surrealist displays of motion blur when used creatively.
Mind that, if you’re smart about your use of ND filters, you can still use shutter speeds in this long-range during the daytime to make interesting stationary shots with lots of motion blur.
1 Minute And Beyond – Astrophotography, Nighttime Landscapes
Shutter speeds slower than 60 seconds are rare, and on most cameras, they require using either the B (bulb) or T (time) setting, or a self-timer.
Their most well-known application is in astrophotography, where exposures lasting not just many minutes, but in some cases even hours can bring out the night sky and create stunning star trail pictures.
These kinds of exposures are also sometimes used late in the evening or early in the morning to produce dreamy-looking landscape shots.
The slow shutter speed means that every kind of motion, from the flow of water currents to the movement of the clouds, will be blurred to the point of appearing perfectly smooth and blended together.
