When framing your photographs, it’s important to think consciously about what composition techniques you might want to make use of. Leading lines are one such photography technique, and they can dramatically alter the feel of your images.
Unfortunately, education on this subject still tends to be relatively limited outside of traditional courses in fine art. That is why I decided to give you this neat overview of how leading lines work in photography, how you can use them, and how to dramatically improve your compositional skills with their help!
This guide was made for every stripe of photog. It doesn’t matter what you shoot. It doesn’t matter what you’re trying to evoke in your audience. And it certainly doesn’t matter how much experience you have.
I believe that anyone practicing this art can benefit from a solid understanding of leading lines.
So, without further ado, let’s get right to it!
What Is Leading Lines?

Leading lines are an example of an overarching concept of geometry in photography. If you imagine your frame as a rectangle, and everything within it in geometric terms following from that, then many compositional elements boil down to combinations of geometric features.
This is because our eyes and brains really like to see things in terms of puzzle pieces, or patterns. As a photographer, you can use this to your advantage.
You can consciously incorporate geometric patterns into your images to induce a certain impression on the viewer. Remember the rule of thirds? That’s what this is all about.
Leading lines are all about directing the viewer’s eyes. The idea is simple: if your frame contains elements that our brain reads as lines, then the eyes will follow those lines instinctively. Think of leading lines as figurative arrows that tell the audience where the main event in your composition is.
Why Use Leading Lines In Your Photography?
It would be too simple to answer this question with, “they make your photos look more interesting”, but it’s true!
Leading lines take the viewer by the hand (or eyeball) and guide them through the frame. They elevate parts of the composition and draw attention to them.
You can accentuate your subject by surrounding it with leading lines. Or maybe there is a secondary element in your photo that you feel would get lost without some additional framing. Leading lines can be an excellent way to do just that.
At the same time, well-placed leading lines can save what would otherwise end up as negative space from being wasted within the image. Especially in compositions where movement plays a role, leading lines can help create a feeling of dynamism and depth.
This depth increases the more three-dimensional space the leading line takes up. The general rule is: the farther across the frame the leading lines “draw” your viewer’s eyes, the more dramatic their impact is.
What Kinds Of Leading Lines Are There In Photography?
Leading lines come in many forms, and you can use them in countless ways. Let’s take a look at some examples to see what each of them does differently.
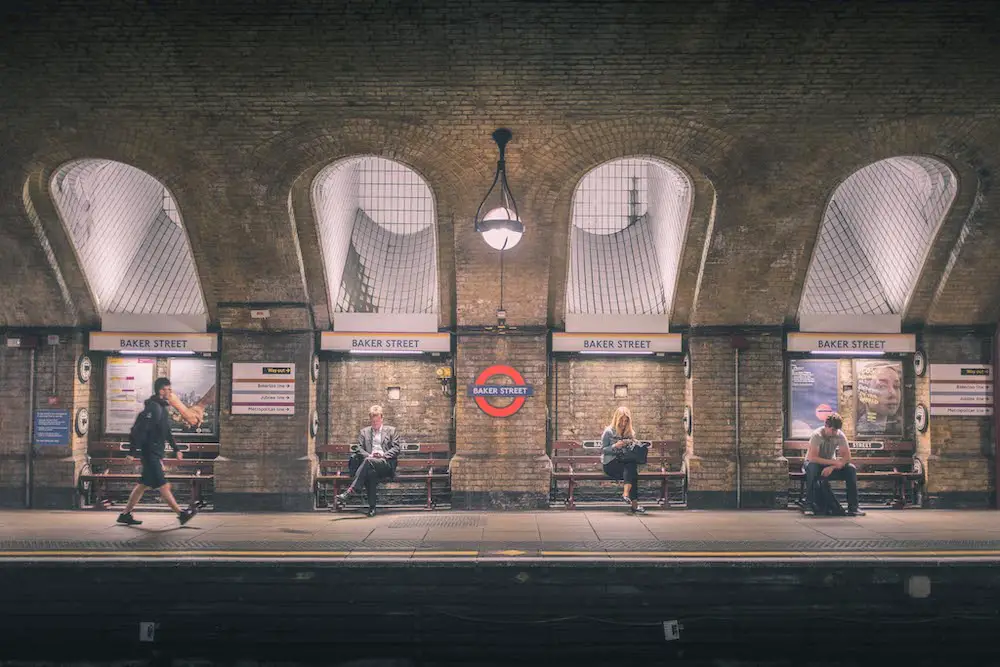
1. Horizontal
Parallel, horizontal lines are very common. Particularly in landscapes, they often appear even without intention. A leading line spanning the entire horizon of the picture can serve numerous roles at once.
It can separate the foreground from the sky, for instance. It can also bring attention to the depth and breadth of the scene – particularly useful if you shoot with a wide-angle lens.
Multiple horizontal leading lines only exaggerate this effect, leading to photography that leaves an impression of vastness, inviting your viewers to explore. Classic examples of these leading lines are fields, shallow hills, beaches, or even the surface of the sea.
Horizontal leading lines can also appear outside of nature, of course. Fences, walls, furniture, windowpanes, and more can all serve this purpose.
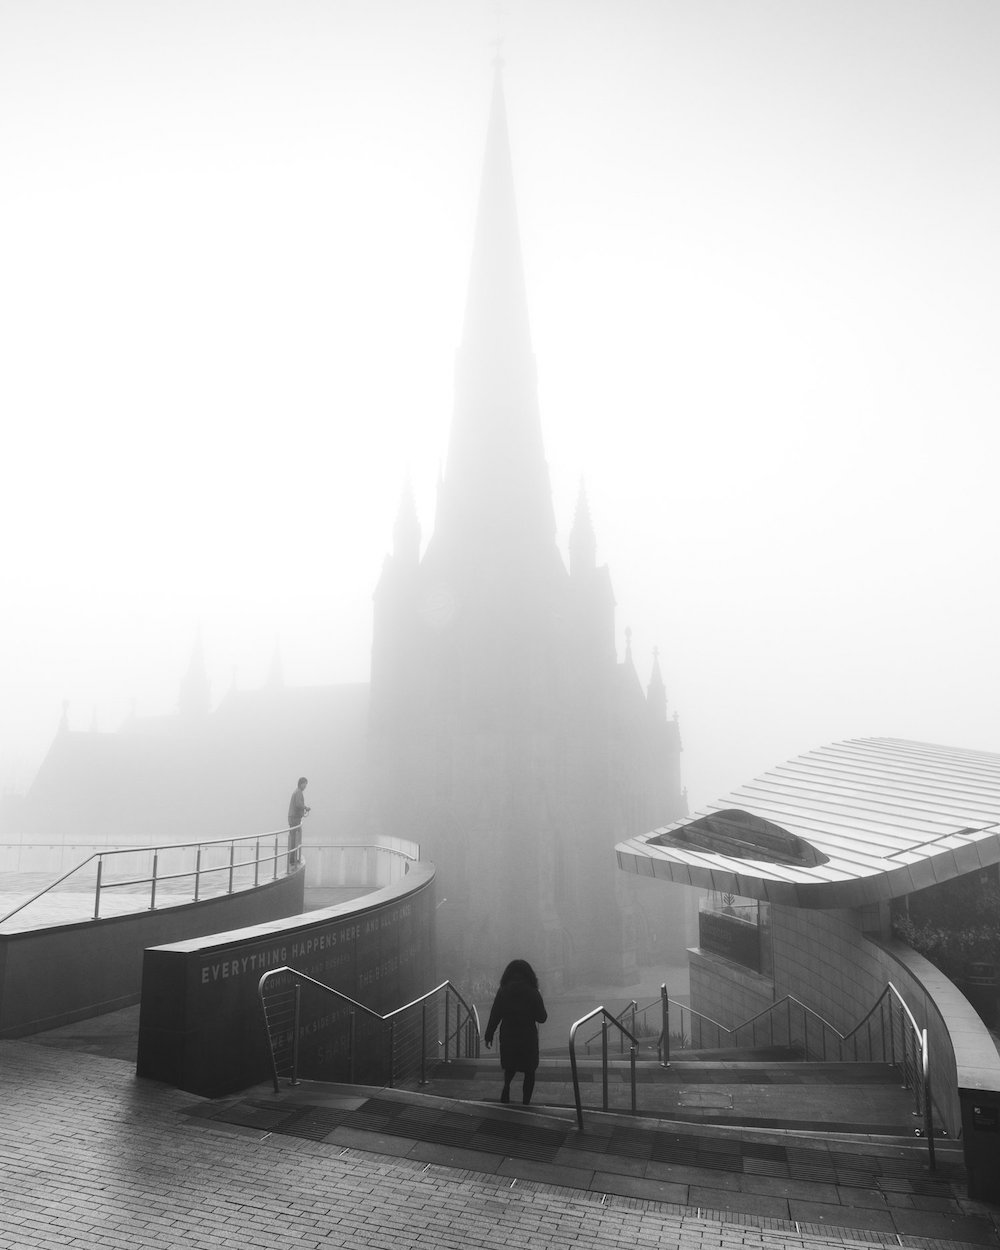
2. Vertical
Vertical leading lines can be just as evocative. They can come in singles, doubles, triples, or more. There is a ton of variety in what you can use to create them.
Think, for instance, railway tracks converging to a point far in the distance. Railings and stairways, towers and other structures, as well as some natural sights like mountains or cliffs, are good choices, too.
Vertical leading lines can help to draw the viewer’s eyes across a tall frame.
Not exclusively photos shot in portrait orientation fall into this category, mind you!
Architectural and street photography often make use of vertical leading lines to enhance the sense of height, length, and extent of the subject.
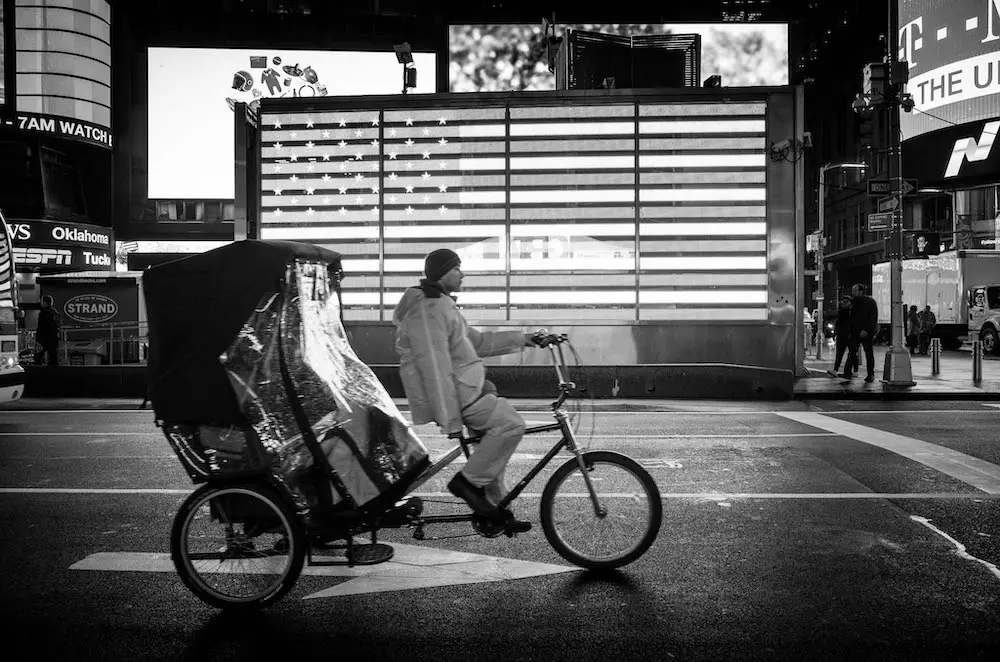
3. Diagonal
Of course, diagonal leading lines also exist and can be just as interesting. When used well, they can emphasize moving subjects and exaggerate a sense of scale and distance.
You can also use diagonal lines to frame a subject towards the center of your photograph.
Remember that any number of leading lines in photography can be parallel, diverging, or converging. This creates different layers of emphasis and feelings of scale in the viewer.
The Difference Between Leading Lines And Paths In Photography
 Leading lines are a broad and simple enough concept to understand. You take a line and use it to draw the viewer’s eyes strategically towards (or away from) certain parts of the frame. Easy, no?
Well, not quite.
Take, for example, the path. A photographic concept you might already be familiar with, paths are also visual lines and motifs crossing your frame. They also tend to draw the viewer’s attention in much of the same way as leading lines do.
So what’s the difference? Does it matter?
And how are leading lines and paths used differently in photography?
The simple answer is that a path is used for a very narrow purpose only. It is there to guide the viewer towards the center of the frame, to the horizon line. By comparison, leading lines can be much more diverse in form and function.
A path can of course be a leading line, and so can a leading line be a path. But the two are not mutually equivalent and represent different goals in composition.
With leading lines, you don’t have to think about where your line is going solely in geometric terms. The content and context of the leading line are much more important.
You can also have multiple leading lines in the same frame targeting different subjects! What’s more, remember that your subjects are not restricted to the middle of the frame. They can be anywhere within the composition, opening up countless possibilities in expression.
How To Use Leading Lines To Improve Your Photography
Now, you should have a solid understanding of what a leading line is, to the point where you should have little trouble identifying one in someone else’s photo.
But other people’s shots are hardly the main reason you stumbled on this article, no?
In that sense, let’s take a look at how you can make use of leading lines to take your own photography up a notch!
1. Analyze Your Scene
This is the number-one most important skill you can practice. Not just for learning how to use leading lines, but for everything that pertains to advanced photographic composition as a whole.
You need to be able to survey your scene with your eyes and figure out what you’re working with.
Depending on your style of photography, you might not need to know how to do this quickly. If you shoot landscapes, the mountaintops aren’t exactly going to run away.
But you do need to have a certain sense of security in being able to assess your composition by yourself.
Try to be spatially aware of your working environment. Leading lines are all around us, all the time.
For the most part, they are just asking to be found! No, really: so much of what we observe, whether in nature or downtown, consists of elements that can be separated into lines.
Don’t get stuck thinking that a candidate for a leading line is “too obvious”. No such thing!
Even a simple, literal path can be a great leading line if you put it to good use in your composition.
So can roads, bridges, railings, facades, hedges, walls, rocks, and more!
2. Learn To Work With Leading Lines To Compose
 Finding leading lines around you is only half the fun. Once you’ve caught one in your viewfinder, it is time to decide what you’re going to do with it.
As we already touched on above, there are countless ways in which you can utilize leading lines to your advantage. First, you need to ask yourself the fundamental question, “What could this leading line be useful for?”
2.1. Examples Of Utilizing Leading Lines Effectively
Let’s say you’re aiming for a street scene, and your leading line is a long fence that covers a lot of distance ahead of you.
You could position yourself with the fence traveling diagonally away from you, and then sit and wait until a subject appears in the negative space that your newfound leading line is “pointing” towards.
Alternatively, you could shoot with your lens perpendicular to the fence so that the edge of the frame lies just where the fence physically ends. This way, again, you have a line taking up the bulk of your composition which is pointing towards negative space that you can fill with a subject (or a few).
Or, how about a real classic? Go on a walk out of town and note how long it takes until you stumble on a pair of empty railroad tracks. These are perfect leading lines, and using them is incredibly intuitive.
You can position your subject right in the middle of the tracks and use them as a central “arrow” directing your viewer’s eyes right towards it.
Or, if the landscape surrounding the tracks is your goal, balance them out accordingly.
You can do this by, for example, making your tracks “disappear” past a certain point. You have many ways of doing this, from changing your focal length to moving to a different vantage point, such as at the foot of a hill.
2.2. Positioning Your Leading Line For Maximum Effect
At this point, I want to draw further attention to how important it is to not just find and use your leading line but to do so in the right context within three-dimensional space. In other words, your leading line doesn’t just need to be there.
It needs to be in the right place, too.
Any leading line is going to have a more dramatic effect on the viewer if it covers a lot of ground. For example, a row of pebbles pointing towards a lake is going to “draw” the viewer much more if it starts in the section of the frame that is the closest to the observer and goes off from there.
Likewise, if you really want to maximize the effect, that row of pebbles should be able to keep going on and on for a long time until it blends with the background.
Such “disappearing” or near-infinite leading lines are perennially popular and for good reason.
They’re impressive, they are attention-grabbing, and they use a whole lot of real estate to frame your subject.
2.3. Balancing Your Leading Lines In Your Photography
None of this is to say that your goal should be to always have leading lines covering the whole frame from foreground to background all the way each time. That would not just be visually exhausting after a certain amount of pictures.
It would also be creatively stifling, and, frankly, a bit boring.
Instead, try to do something else. Try to give each leading line the space in the composition that it deserves. Try to bring out its strengths, and utilize it in a way that brings out the characteristics that stand out to you when you view it in person.
If your choice of leading lines is a pair of tall walls, for example, and you want to accentuate their height, there are many things you could do. If it’s a pair, how about you flank your subject from both sides?
This can be especially powerful if you’re using a wide-angle lens.
How To Improve Leading Lines Technique And Elevate Photography
 Following the above steps for discovering and using leading lines in your photography is all fine and dandy. However, for many of us, it’s easier said than done.
Developing a sense for catching leading lines, and a separate and equally-strong sense for composing with them can be part of a lifelong journey. That is why in this section, we are going to talk about some tangible methods you can try and experiment with to get in touch with the leading lines hidden in plain sight all around you!
Technique 1: Consider Your Environment
Your shooting location and the local conditions factor greatly into your use of leading lines. For example, if you’re outdoors at midday, your top candidates for a leading line would be solid structures. Think concrete walls, facades, sharp cliffs, and so on.
By contrast, later in the day, long shadows spread across the scenery might be strong enough to serve as leading lines of their own! You need to assess the geometric composition of where you are and find out what the most striking lines in your field of view could be.
Most of the time, it can be beneficial to settle on a subject first. With your target set, it is easier to then think of what leading lines can accomplish to draw attention to it and complement it in some way.
Remember that a big part of the effectiveness of any leading line is how it is positioned. If you see something that’s the right shape and size to be a leading line, but it’s not “clicking”, try looking at it from a different angle or vantage point.
The point of a leading line, from a purely practical perspective, is to draw the viewer in. So survey your surroundings for anything that draws you in first – chances are if it works on the photographer, it’ll work even better on the audience!
Technique 2: Lie Low And Wait
There’s a technique to maximizing the impact of leading lines in photography that is often called “fishing”. This is in complete contrast to the method I laid out above and is often used in street and candid photography.
Your shooting style and choice of subject might determine whether this approach will be helpful to you.
The principle itself is simple enough. Instead of settling on a subject in advance, first find and consider your leading lines.
You may treat the leading lines themselves as the subjects here, for what it’s worth. Build your composition around them.
Allow the leading lines to play as large of a role within the composition as you think makes sense.
Frame, get ready for the shot – but leave some empty space.
This is not to say you should compose in a sloppy manner on purpose. Far from it!
The idea is to allow your leading lines to direct the viewer toward a subject, without immediately setting in stone what that subject will be. “Fishing” refers to the slow, yet cautious approach that this requires. You might have to sit still and lie low for quite a while until the perfect subject enters the frame.
Technique 3: Consider Going Wide

Among photographers who compose a lot of scenes using leading lines, it’s no secret that having a good wide-angle lens is a great asset. Wide-angle lenses do two incredibly important things that help leading lines unfold and express themselves.
First, they show more of the frame. This amplifies the impact of leading lines simply because it gives you more space to make use of them. Especially when working in close quarters, this can make or break the shot.
Secondly, the wider you go, the more distortion you experience at close range. I am not talking about fisheye lenses (that’s a topic for another day). However, any wide-angle lens is going to display subjects closer to the camera as noticeably less “flat” than a telephoto or normal lens. This affects the way the viewer approaches the composition.
These traits go hand-in-hand and make it easier for you to recognize leading lines. You might also have less trouble putting them to good use within your composition as you’ll have more space to use them in.
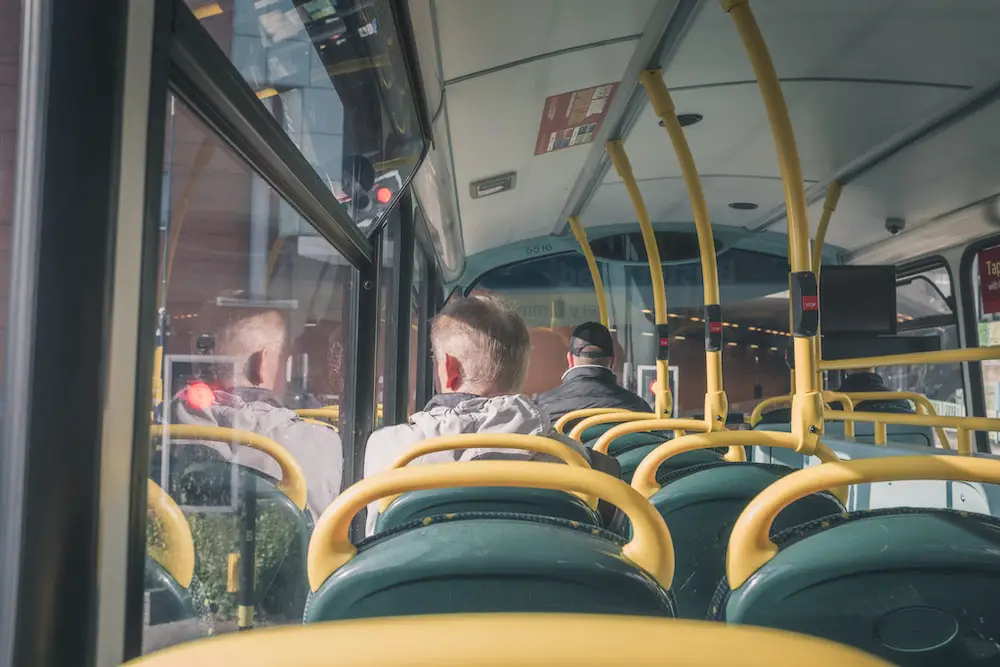
Technique 4: Go Beyond The Obvious
Leading lines don’t always have to be just that: straight, explicit, concrete. They can also be implied and complex in form!
For example, in compositions where a human subject is at the heart of the frame, even the tiniest hint of a line can be enough to naturally draw our eyes in that direction.
Also, consider leading lines that serve more than one obvious role. Patterns of intersecting lines can be even more powerful than singles or doubles, for example.
This stays true even if the leading lines don’t actually lead to any single, obvious point.
Getting your viewer’s eyes moving is a goal in and of itself – if they’re scanning the frame with their eyes, they’re taking in the photo and its message. There doesn’t need to be one specific endpoint to that.
Technique 5: Consider Posing Your Subject
Leading lines are often talked about in the context of fast-paced street or action photography. Having a good sense of composition and being able to use it in the heat of the moment is certainly crucial in those fields.
But what if your style of photography is entirely different? What if you have no trouble assuming a slower, more elaborate creative process?
In this case, I’d invite you to practice your leading lines by staging your shots. Invite a friend to play the role of the subject for you, or make use of objects that you can place wherever you please within the scene.
Move around, play with different points of view, and really try to get a good feel for the leading lines this way.
Technique 6: Keep Shooting!
When you have caught a leading line in your viewfinder, don’t rest after a shot or two.
Especially if you’re still new to working with leading lines in your photography, there’s no excuse for not spending a generous amount of shots on experimentation.
Try to display the line from every angle that works. Shoot in portrait and landscape orientation. Cover the full gamut of whatever focal lengths you have available. Try out different choices of subjects, so on and so forth.
At the end of the day, it’s so much easier to tell whether a leading line shot “clicked” from the comfort of your home, in your (digital) darkroom.
So save that for then, and while you’re still out shooting, stay on your feet and keep your finger on the shutter release!
Conclusion
Composing with leading lines can help make your photographs look more refined, professional, and attractive. This has made it an indispensable skill for countless around the world.
As we have seen today, there is a lot that goes into this. It’s certainly not something you can expect yourself to master in a day. However, by following some of the tips from this guide, I hope that you can come closer to realizing your goals in composition and expression with the help of leading lines.
Now, all the theory in the world is useless without some practice. So go out there and take some pictures!
